


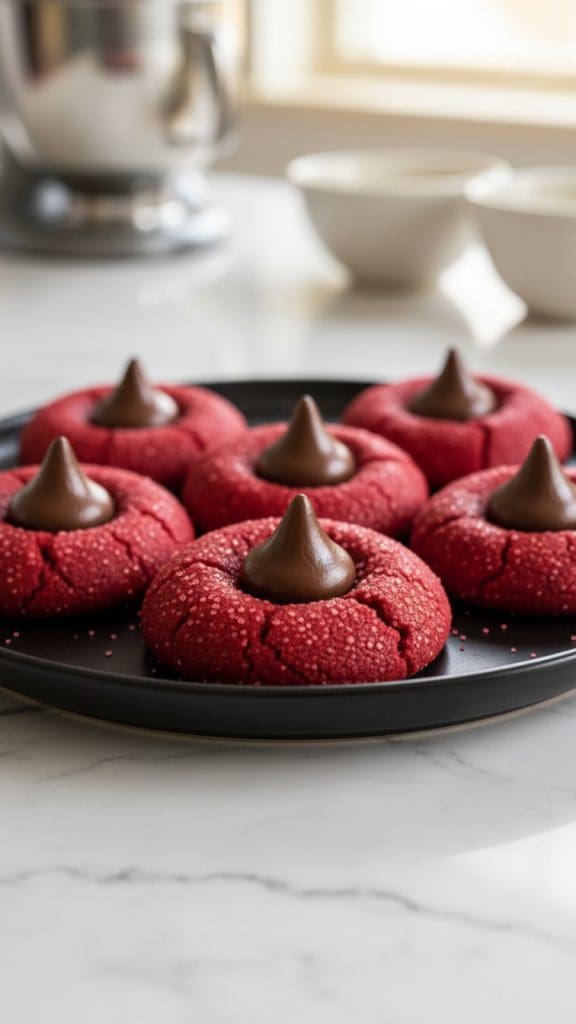
I was not planning to bake these. I had leftover Hershey’s Kisses from Christmas, it was raining, and I figured, why not try bake some Red Velvet Blossom Cookies. Next thing I know, I’ve got this tray of bright red cookies sparkling on the counter like tiny ornaments. I texted a photo to my friend and she asked where I bought them. So that tells you everything.
They’re red velvet but easier. Soft in the middle, a little crisp at the edges, and the chocolate kiss just sits there all glossy and perfect. You know those cookies that somehow look “extra” even though they’re basic to make? Yeah, this is one of those. I’ve made them twice now and they always disappear faster than I expect.

Why You’ll Like These
- You don’t need to chill the dough.
- They look fancy but take maybe 25 minutes.
- You probably have everything already.
- They’re the kind of cookie that makes people think you “bake a lot.”
Ingredients

Nothing fancy, just the good stuff:
- Butter – Softened, not melted. I always forget to take it out early.
- Brown sugar – Makes them soft and chewy.
- Granulated sugar – Helps the edges crisp.
- Vanilla extract – Always.
- Egg yolk – Just the yolk keeps them rich.
- Red food gel – The bright stuff. Not liquid dye unless you want pink.
- Flour – Regular all-purpose.
- Cocoa powder – Just enough for that red velvet vibe.
- Baking powder – So they puff up.
- Salt – A pinch. Always a pinch.
- Red sanding sugar – Optional, but the sparkle is worth it.
- Hershey’s Kisses – The signature moment.
How To Make Them
Preheat the oven to 350°F (175°C). Line your tray with parchment.
Beat the butter with both sugars until it’s creamy and pale. Don’t overthink it – just smooth. Add the yolk, vanilla, and a little food coloring. Stir it in, then add the flour, cocoa, baking powder, and salt. It’ll come together fast, kind of thick.
Scoop the dough into little balls, roll them in your hands, then coat them in the red sugar. I usually roll half of them plain too, just to see which I like better. (It’s always the sparkly ones.)
Bake for 9 or 10 minutes, no longer. They’ll look soft but that’s what you want. Pull them out and immediately press a chocolate kiss into the center of each cookie. The chocolate will get shiny and just start to melt. Let them sit a bit before moving – they’re delicate when warm.

Little Tips & Things
No red sugar? Totally fine. Plain cookies look simple and classic. Sometimes I dust them with powdered sugar once they cool.
Want to freeze them? You can. I freeze the dough balls, then bake straight from the freezer. Add maybe two minutes.
Natural coloring? Works, but it’ll be more muted. I tried beet powder once, and it was… earthy. Pretty though.
How long do they keep? Four or five days, airtight tin. They stay soft if you add a tiny piece of bread inside. Old trick from my grandma.
I make them for Valentine’s, but also in December when I’m pretending to be organized. They’re easy, they look sweet on a plate, and they taste even better than they look.
Recipe Card

Red Velvet Blossom Cookies
Description
Description: Soft, chewy red velvet cookies rolled in sparkly sugar and topped with a classic chocolate kiss. Perfect for Valentine’s Day, Christmas, or anytime you want a pretty, bakery-style cookie without a lot of effort.
Ingredients
Ingredients:
Instructions
-
Preheat the oven to 350°F (175°C) and line a large baking sheet with parchment paper.
-
In a mixing bowl, cream the butter, brown sugar, and granulated sugar together until smooth and fluffy.
-
Mix in the egg yolk, vanilla extract, and red food coloring until evenly combined and bright red.
-
Add the flour, cocoa powder, baking powder, and salt, then mix just until the dough comes together.
-
Scoop the dough into 18 small balls, roll them between your palms, then roll each one in red sanding sugar.
-
Place on the baking sheet and bake for 9 to 10 minutes until set but still soft in the center.
-
Remove from the oven and immediately press a chocolate kiss into the center of each cookie. Let cool on the tray for 10 minutes before transferring to a rack.
Note
These cookies can be made ahead and stored in an airtight container at room temperature for up to 5 days.
The baked cookies freeze well for up to 1 month, thaw at room temperature before serving.
You can swap milk chocolate kisses for dark or white chocolate if preferred.